By Annie Brooks
A lesson written for the teacher rather than the worker, in the language of the Victorian schoolroom: elicit, recapitulate, examine girls’ work. Everything is counted in threads of the canvas and demonstrated on a chequered board first.
Don't lose this article. Enter your email below, and I'll send it to you right now. Plus a little crochet inspiration from me, straight to your inbox.
Why linen was marked at all
Method — 1. (a) Show a garment with letters and figures marked on it, and explain that it is necessary to mark our garments, in order to recognise them, and to distinguish them from those of others in the same household; (b) write the word marking on the board, and elicit that it means a sign; (c) allude to the use of marking ink, and explain that though writing the initials or name in full in ink is a quick method, yet it is expensive, and that some marking inks run into blots, and also fret the materials into holes; (d) show the girls the proper kind of red and blue ingrain sewing cotton, that is generally used to mark underclothing and household linen, and tell them if the dye is ingrain, the cotton will not lose its colour when washed; (e) show by the garments that the stitch is worked on the right side, and on single material.
The stitch, counted in threads
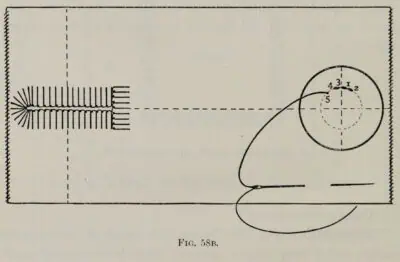
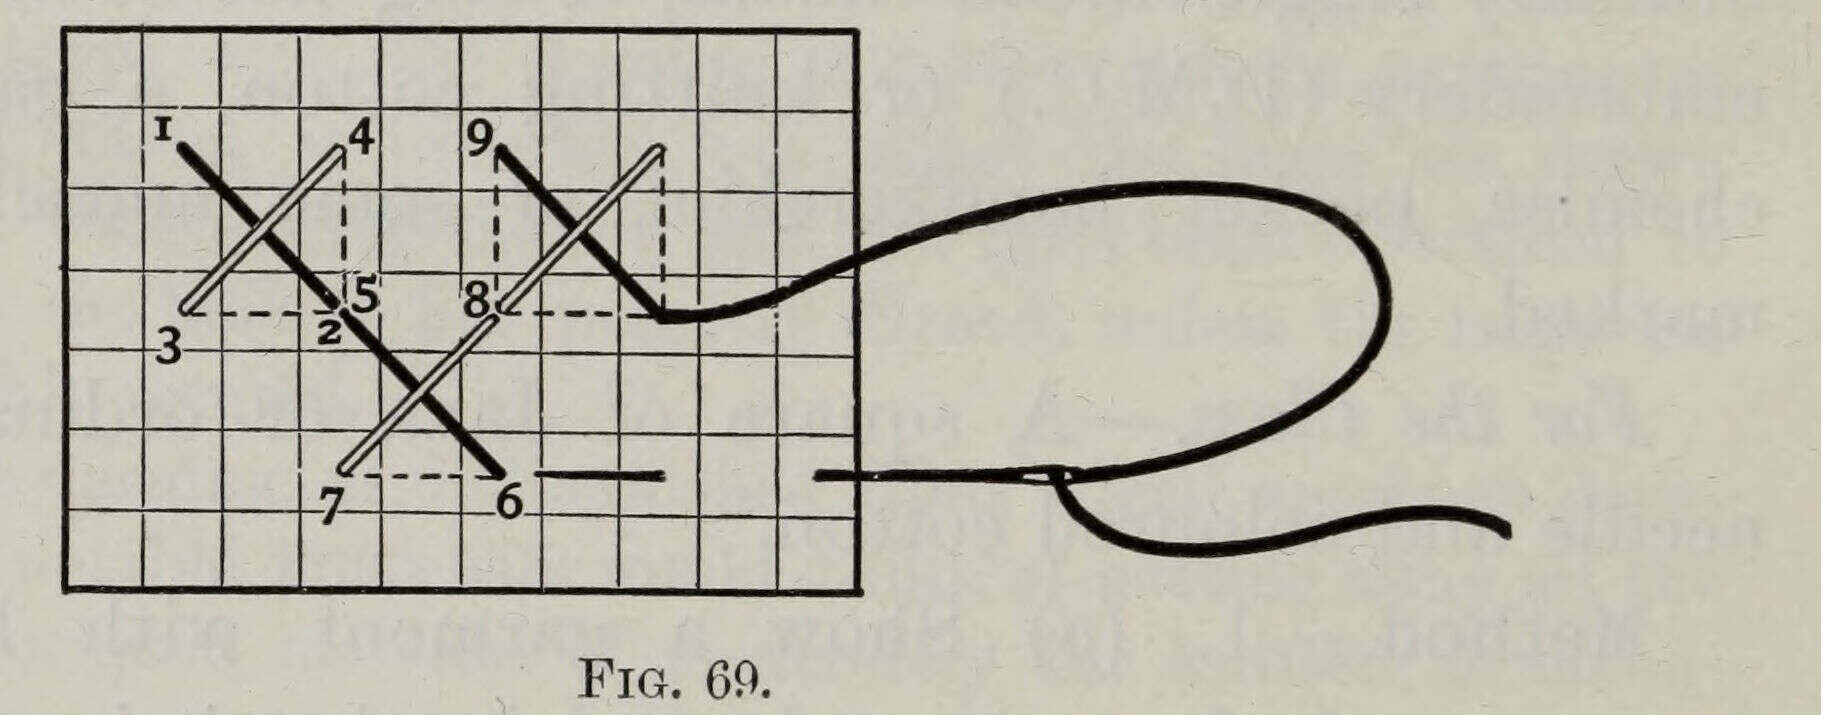
2. The Stitch — Fastening on — Demonstrate on the frame how to fasten on: (a) bring the needle from the wrong side to the right between two selvedge threads on the lefthand side, and leave about an inch of cotton, which will be secured by working the cross stitches over it; (b) put a chalk dot between two selvedge lines of the board, and call it No. 1 (Fig. 69); (c) recapitulate on the frame, the class working with you; examine work; (d) show how to put the end of cotton on the wrong side in a slanting direction under the forefinger, so that it may be worked over, then tell the class to count with you two threads to the right, and down two threads, and put the needle under two threads horizontally from right to left.
Let the class do the same on their canvas, then draw the needle through, while you do the same on the frame; (e) point out that a slanting stitch has been made covering two threads, and explain that in marking two threads are generally taken each way, and that the stitch is made of two slanting stitches crossing each other; examine work; (f) recapitulate by chequered board, telling class to put samplers down, and work with you, count down two lines from No. 1, and two to the right, and put a chalk dot in the space, and mark it No. 2, then count two lines to the left of No. 2, and put a chalk dot, and mark it No. 3, draw a slanting line from Nos. 1 to 2, and dot a straight line from Nos. 2 to 3: (g) tell class to take up samplers, and, at first, to watch what you do on the frame, then to work with you.
Count up from where the cotton is coming out two threads, and two threads to the right, then put the needle in perpendicularly, so that the point comes out at No. 2, let the class do the same, and then draw needle out; examine girls’ work; (h) recapitulate by the chequered board; count up from No. 3 two lines, and to the right two, and put a chalk mark — No. 4, then count down two, and put a mark — No. 5; draw a slanting line from Nos. 3 and 4, and dot a straight line from Nos. 4 to 5 (Fig. 69).
N.B. — The first half of every stitch should be illustrated on the board in one coloured chalk, and the second half in another, so that the rule of crossing every stitch in the same direction as the first stitch, may be clearly shown.
3 — If in the first stitch, the second and upper half crosses the first and under half from left to right, all the succeeding stitches must be crossed in the same direction,
Don't lose this article. Enter your email below, and I'll send it to you right now. Plus a little crochet inspiration from me, straight to your inbox.
4 — (a) Count down from where the cotton is coming out two threads, and two to the right, and put the needle under two threads horizontally, and draw it out, the class working with you; examine girls’ work; (b) recapitulate by the chequered board, drawing a slanting line from Nos. 5 to 6, and a dotted straight one from Nos. 6 to 7 (Fig. 69); (c) demonstrate by frame, the class working with you, count up from where cotton is coming out two threads, and two to the right, and show how to put the needle under two threads vertically, so that the point of the needle comes out upwards, draw needle out, and elicit that the cotton is coming out two threads away from the first stitch, and in the proper position to make the under half of third stitch in the same direction as in the first and second stitches; (d) recapitulate by illustrating in two coloured chalks as before, and examine work; (e) the third stitch is worked in the same way as the first, and the fourth as the second, all along the sides of the sampler; (the girls should tell you how to work the third stitch); (f) illustrate the third stitch, which completes the pattern (Fig. 69).
Notes — 1. Any other simple pattern may be taught in the first lesson, or the single stitch may be worked in a straight line. If the stitch in a straight line is taught, then the first half must go from left to right, and the dotted line will be perpendicular, the second half will cross from right to left, and will be slanting on both the right and wrong
If in the first stitch, the second and upper half crosses the first and under half from left to right, all the succeeding stitches must be crossed in the same direction.
| Rule | As the lesson gives it |
|---|---|
| Threads per stitch | Two each way |
| Height of a capital | Seven cross stitches |
| Threads left between letters | Two, four or eight, according to the quality of the material; eight on fine linen |
| Between initials | A cross stitch, to stand for a full stop |
| Between the two I’s of a repeat | Two threads, joined afterwards by two extra stitches in the centre |
Every capital derived from the letter I
Method — 1. (a) As soon as the girls can work the stitch accurately, either in straight lines or in simple patterns on their samplers, write on the board the capital letters, with which they must be thoroughly familiar, before the Annual Examination (E, H, I, L, O, T); (b) sketch the letter I in the shape known as the diamond, on the chequered board, in two coloured chalks, so as to show clearly that the crossing is all in the same direction; (c) elicit that the pattern taught in the first lesson forms portions of the diamond-shaped I, and explain that by analysing the letters, you have found out that this letter is the simplest capital in the alphabet; (d) let the girls analyse the remaining five letters with you, before they proceed to mark the letter I; and elicit that H is a compound of I, and is a little more difficult to mark; that L is I with additional stitches at the bottom towards the right; that E is I with additional stitches at top and bottom, and in the middle towards the right; that T is I with additional stitches at the top to the left hand and the right hand; that O is not at all like I; (e) explain that O is the simplest of the circular letters, and the type of O, G, and Q; (f) recapitulate the stitch on the frame, working with the class, till the whole of the letter is finished, and illustrating step by step on the chequered board, with the different coloured chalks; (g) point out that all capital letters are seven cross stitches high, that every letter must letter is begun; (h) sketch the letter H on the chequered board, four lines away from the letter I, and point out that some threads of the material must be left between each letter, and that the number of threads varies, being two, or four, or eight, according to the quality of the material to be marked (on fine linen eight threads must be left), and that when the capital letters are initials (write this word on the board and explain its meaning), a cross stitch must be placed between each to indicate a full stop, as in writing or printing; (i) recapitulate the stitch on the frame, working with class till the first I is completed, then let girls fasten off, and begin the second I two threads away from the first, and when this part is finished show how to connect them by two extra stitches in the centre; (j) illustrate step by step on the board, and examine girls’ work frequently.
| Letter | How the lesson derives it from I |
|---|---|
| I | The simplest capital in the alphabet, worked as a diamond |
| H | A compound of I, a little more difficult to mark |
| L | I, with additional stitches at the bottom towards the right |
| E | I, with additional stitches at top and bottom, and in the middle towards the right |
| T | I, with additional stitches at the top to the left hand and the right hand |
| O | Not at all like I; the simplest circular letter, and the type of O, G and Q |
Source
Elizabeth Rosevear, A Text-book of Needlework, Knitting, and Cutting Out (1893). Public domain. Internet Archive textbookofneedle1893rose.
Reproduced verbatim from the scanned original. Obvious scan errors (broken letters, words split across a line) have been mechanically corrected; nothing has been rewritten or modernised.