By Annie Brooks
Netting has a vocabulary of its own, and almost all of it comes back to the mesh: the loop is formed over it, and its size is what tells one variety from another. The Dictionary’s short entries follow.
Don't lose this article. Enter your email below, and I'll send it to you right now. Plus a little crochet inspiration from me, straight to your inbox.
The words: knot, loop, mesh, round, row
Knot — The Knot made by twisting the cotton round the Mesh and fingers is made with every Netted Loop, and is essential to its security. The manner of making it is described in Plain Netting and Fisherman’s Knot.
Long Loop — Loops in Plain Netting are sometimes made of two different sizes in the same row. This is managed as follows: Net in the ordinary way until the place is reached where a Long Loop has to be Netted, then put the cotton twice round the Mesh instead of once, and make the Knot as in Plain Netting.
Loop — A loop in Netting takes the place of a stitch, it is formed over the Mesh, and is secured by a Knot, as described in Plain Netting, or in Fisherman’s Knot.
Mesh — The instrument used in Netting to work the Loops upon, and is made of bone, steel, or wood of various sizes, either round or flat, according to the size of the loops to be made. A Mesh was at one time called a Spool, on account of the title Mesh being also given to the loops of Netting when quite completed as Squares, Rounds, or Diamonds.
Round — When Netting is worked as a continuous looping, without any turning of the work, a Round has been made when each Loop upon a level has been worked. To net a Round: Join the Netting as in Circle, and indicate the last Loop by marking it with a piece of coloured wool. Net until that loop has again to be worked.
Row — In Netting, this term indicates the Loops from one side of the work to the other. To make a row: Commence on the left hand side of the Foundation, and Net every Loop into a new knot until the last upon the right hand side is reached. In working curtains and other large articles, a Row is frequently a yard in length.
As the loops forming this yard could not be contained upon one Mesh, slide the first made ones off on the left side as the new ones are formed on the right, but always leave enough made Loops upon the Mesh to be a guide, as to size, to the ones being made. Draw the Mesh entirely out when the Row is completed, and commence a new Row.
Turn the Netting over in the hand, place the Mesh close to the loop last made, and make a new Loop upon it, and work from the left to the right, the Loop last made in the last Row make the first Loop into of the new Row.
Keeping the work stretched
Stirrup — Netting which is really a succession of Loops secured in position by knots requires to be kept stretched while in progress, or the Loops made are unequal in size, and the knots are not drawn up tight. This stretching is accomplished by either pinning the Foundation Loop of the Netting to a lead Cushion, or attaching it to the foot with the help of a Stirrup, the last plan being the one usually adopted, and the best.
To make a Stirrup: Take a piece of oak or elm, four to five inches in length, and an inch and a half in width, and bore a hole in the centre through each of its ends. Take two yards of ribbon, an inch wide, of a strong make, pass each end through a hole, and sew the two ends together, or tie them underneath the piece of wood; put the piece of wood under the left foot, and bring the ribbon up as a loop.
Regulate the Long Loop thus formed by the height of the worker, as it should always reach to the knee. If the ends of the ribbon are only tied together the Stirrup can be shortened during the progress of the work, which is often an advantage. A more ornamental Stirrup can be made by Embroidering a narrow band to pass over the instep, and attaching that to the ends of wood, and making the loop of ribbon rise from the centre of the embroidery; but for ordinary Netting the plain Stirrup is the best, as the whole of the weight of the foot is upon it.
Regulate the Long Loop thus formed by the height of the worker, as it should always reach to the knee.
The named varieties
Caroline Netting — This can either be worked in single fleecy wool and round wooden Meshes, for scarves and shawls, or with fine crochet cotton of a medium size, and with a flat Mesh an inch in width, for curtains and windowblinds. To work: First row — Net in Plain Netting upon the Foundation Loop enough Loops to make the length of the article required.
Second row— work as for Plain Netting, but take up the second Loop upon the needle, and then push the first Loop over it, and net these two Loops as one. Net another and a Plain Loop into the same Loop, a Plain Loop upon the third Loop, and repeat from the commencement for the rest of the row.
Third row — Plain Netting. Fourth row— as the second row. Repeat the second and third row three times; then take a rather wider Mesh and Net a plain row with that, and repeat from first row.
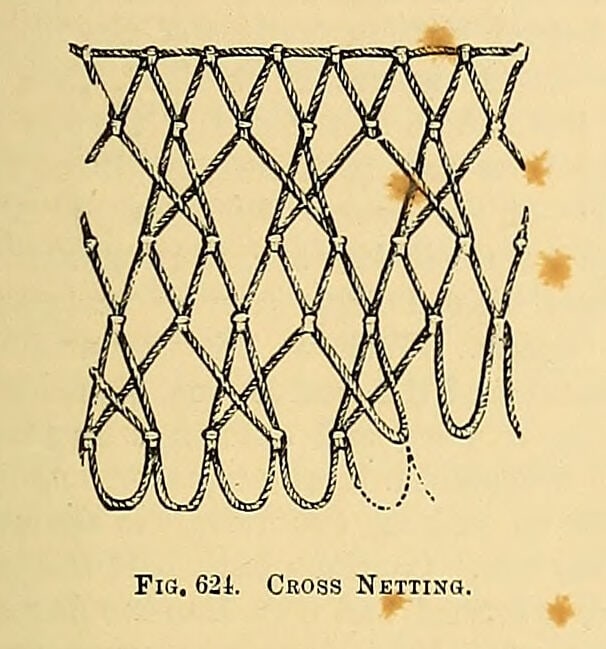
Cross Netting — This is used either for the centres of scarves, shawls, or curtains, or as a border to plain netted articles. Medium sized knitting cotton, and two flat Meshes, one half the size of the other, are required. To work: First row — take the smallest Mesh, and Net in Plain Netting the length required.
Second row — Net in Plain Netting with the largest Mesh. Third row — take the narrow Mesh, Net a Loop, taking the second Loop of the last row, then Net the first Loop of the last row, then the fourth, and then the third; continue to the end of the row, always Netting the second Loop on the last row before the one next the Mesh.
Fourth row — use the largest Mesh and Net a plain row. Fifth row — as the third row; this row is not completed in the illustration, so that the crossing of the two Loops in it should be fully indicated.
Don't lose this article. Enter your email below, and I'll send it to you right now. Plus a little crochet inspiration from me, straight to your inbox.
Diamond Netting — This is a term applied to Plain Netting, and is worked as such when the loops are made of an uniform size, and following each other in i-egular succession. Fancy Diamond Netting is worked in three different ways, as follows: —
Single Diamond Netting — Work with fine silk or cotton, and Mesh and Needle No. 10. Net the first Loop in ordinary Plain Netting, and the second in the same way, but pass the cotton twice round the Mesh, so as to make this Loop twice the size of the other. Repeat these two Loops to the end of the row.
In the next row make the short Loop over the Long Loop of the last row, and work as in the first row.
Treble Diamond Netting — Use the same cotton. Mesh, and Needle, as for Single Diamond Netting. First row —make a Plain Netting Loop, but put the cotton twice round the Mesh. Then Net three Plain Netting Loops, and repeat these four Loops to the end of the row. Second row — a plain Loop over the Long Loop in the last row, then a Long Loop and two plain Loops; repeat to the end of the row, and withdraw the Mesh before a long Loop is Netted as a plain Loop.
Third row— Net a plain and a Long Loop alternately, commencing with two plain Loops should the pattern require it. Fourth row — Net three plain Loops and one Long Loop; repeat to the end of the row. Fifth row as the second row.
Diamond Netting made with Five Loops — Use the same cotton, Mesh, and Needle as in Single Diamond Netting, and work the Long and the Plain Loop in Plain Netting; take the Mesh out of the work when a Long Loop has to be netted as a Plain Loop, and, after this has been done, the pattern forms a diamond of small loops surrounded by an open space formed by the Long Loops — commence by Netting upon the Foundation Loop a number of loops that divide into six and one over.
First row — make a Long Loop with the cotton twice round the mesh, and 5 Plain Loops; repeat to the end of the row, finish with a Long Loop. Second row — Plain Loop over the Long Loop, a Long Loop, 4 Plain Loops; repeat to the end of the row. Third row — a Plain Loop, a Long Loop, 4 Plain, the last over the Long Loop; repeat to the end of the row.
Fourth row — a Plain Loop, a Plain Loop over the Long Loop, a Long Loop, 3 Plain, the last over a Long Loop; repeat to the end of the row. Fifth row — a Plain Loop, a Plain Loop over a Long Loop,* a Long Loop, 5 Plain, the last over a Long Loop; repeat from * to the end of the row.
Sixth row — 2 Plain, 1 Plain over a Long Loop, a Long Loop, 2 Plain, the first over a Long Loop; repeat to the end of the row. Seventh row — -3 Plain, the last over a Long Loop, a Long Loop, 2 Plain; repeat to the end of the row. Eighth row — 4 Plain, the last over a Long Loop, a Long Loop, a Plain Loop; repeat to the end of the row.
Ninth row — 3 Plain, the last over a Long Loop, 1 Plain; repeat to the end of the row. Tenth row — 3 Plain, the last over a Long Loop, 2 Plain, the last over a Long Loop, a Long Loop; repeat to the end of the row. Eleventh row — 2 Plain, the last over a Long Loop, 3 Plain, the last over a Long Loop, a Long Loop; repeat to the end of the row.
Twelfth row — 2 Plain, the last over a Long Loop, 4 Plain, the last over a Long Loop; repeat to the end of the row, but end with a Long Loop instead of a plain one. Thirteenth row — work as the first, and repeat from there.
English Netting, also called Honeycomb — Work with any sized Mesh and cotton according to the article to be made. First row — Plain Netting. Second row — also Plain Netting, but Net the second Loop before the first, the fourth before the third, and so on to the end of the row. Third row — Plain Netting.
Fourth row — as the second, but commence with a Plain Loop before beginning the crossing. Fifth row — Plain Netting. Sixth row — as the second row, and repeat from that row.
| Variety | Mesh or meshes named | Rows in the repeat | Recommended for |
|---|---|---|---|
| Caroline Netting | Round wooden meshes, or a flat mesh an inch wide; then a rather wider one | Four, repeated three times | Scarves and shawls; curtains and window-blinds |
| Cross Netting | Two flat meshes, one half the size of the other | Five | Centres of scarves, shawls and curtains, or a border |
| Single Diamond Netting | Mesh and Needle No. 10 | Two | |
| Treble Diamond Netting | Mesh and Needle No. 10 | Five | |
| Diamond Netting made with Five Loops | Mesh and Needle No. 10 | Thirteen | |
| English Netting, or Honeycomb | Any size, according to the article | Six |
A stronger knot, for nets that take wear
Fisherman’s Knot — This Knot differs from the one ordinarily used in Plain Netting, and is considered to be stronger. It is used by fishermen for their nets, hence its name; and is also used for hammocks, lawn tennis nets, and other articles subject to wear. The Knot when made is thicker than other Knots.
To work: Hold the Mesh and the netting needle in the ordinary way, the thumb over the Mesh and the fingers supporting it; pass the thread round the Mesh but not over the fingers, and put the needle upwards through the Loop that is to be worked, and then draw the Loop up to the Mesh, and keep the thread tight by holding it down with the thumb.
Allow the loose thread to fall to the left of the work, and put the needle upward behind, the Loop being worked, so as to enclose it with the thread, and draw the thread tight.
Source
S. F. A. Caulfeild and Blanche C. Saward, The Dictionary of Needlework. Public domain. Internet Archive dictionaryofneed002caul.
Reproduced verbatim from the scanned original. Obvious scan errors (broken letters, words split across a line) have been mechanically corrected; nothing has been rewritten or modernised. The Circle entry, which cannot be followed without its diagram, is omitted.