By Annie Brooks
This is written to the teacher, not to the worker. Every instruction begins “Show children how to”, and the whole lesson is demonstrated on a Demonstration Frame and a chequered board before a needle touches calico.
Don't lose this article. Enter your email below, and I'll send it to you right now. Plus a little crochet inspiration from me, straight to your inbox.
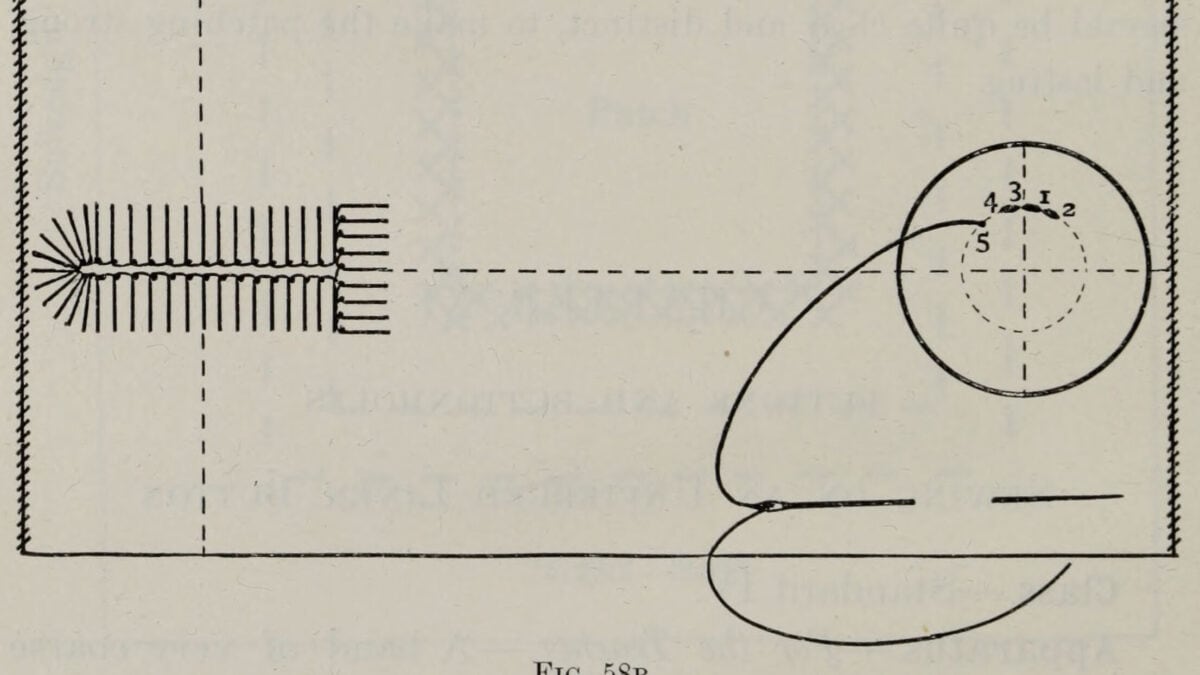
9 — (a) Show children how to bring the needle from the wrong to the right side of the button, somewhere on the circle, and then show by the Demonstration Frame or your calico band how to put the needle back two or three threads, and push it through the button and the band, and draw it out gently and loosely to the wrong side; (b) illustrate the stitch on the button, marking the place where the cotton first came out No. 1, and the place where the needle was put in to form the stitch No. 2 (Fig. 58b).
Examine children’s work; (c) show how to put the needle through the wrong side of the band, and bring it out on the circle, either two or three threads above or below the first stitch, then how to put the needle back close to the stitch already made, and above or below the cotton at the back, as in ordinary stitching.
(elicit the reasons given in Standard III. for doing this), and draw the needle out as before; (d) illustrate and examine; (e) explain that stitching on the surface of the button must be neat and regular, and on the wrong side must be cord-like, as in ordinary stitching; (f) go on demonstrating, illustrating, and examining, till children are ready to make the last stitch, then show them how to put the needle back to touch the last stitch, and bring it out between the button and the band; (g) explain ( 1 ) that the stitching which is loose on the surface of the button must be tightened, and (2) the cotton lying between the button and the band must be protected from the friction of the buttonhole, and (3) that the button must be raised, and all three by means of a hand-made stem or shank of cotton.
10. Stemming the Button — (a) Show a button with a shank, and elicit that this kind of button is raised, and so gives a buttonhole plenty of space to rest on underneath it, but linen and other buttons without shanks must always be raised by stemming with cotton or linen thread, or silk to match the material upon which they are being sewn; (b) show children how to stem by winding the cotton four or more times round the button rather tightly; (c) when they have stemmed it, examine to see if correctly done, and then show how to fasten off, on the right side of the band, under the button, and break the cotton.
Notes — 1. All buttons, whether pierced or unpierced, should be stemmed by rings of cotton, if they have no shanks, when bought. 2. If the metal rim to the button is narrow, then the circle of stitching on it must be half-way between the outer edge and the centre, but if broad, the stitching may be worked close to the rim, so that a sufficient space is left for the buttonhole to lie quite flat under it. 6.
Pierced buttons must be fastened to a garment by means of the two, three, or four holes on them, by stitches passed through the holes and forming sometimes straight stitches and sometimes crosses or triangles. Bone, metal and pearl buttons used on men’s and boys’ clothing must be very strongly fastened and stemmed. 7. If a button is required for a pinafore, etc., where there is no hem, a piece of tape or calico must be placed on the wrong side of the garment, to form double material, for if buttons are sewn on single material, they cause it to break away into holes.
| Situation | The rule the book gives |
|---|---|
| Any button with no shank | Stemmed by rings of cotton wound four or more times round it |
| A narrow metal rim | The circle of stitching half-way between the outer edge and the centre |
| A broad rim | The stitching may go close to the rim, leaving the buttonhole space to lie flat |
| A pierced button | Fastened through its two, three or four holes, as straight stitches, crosses or triangles |
| Bone, metal and pearl on men’s and boys’ clothing | Very strongly fastened, and stemmed |
| A pinafore with no hem | Tape or calico laid on the wrong side, so the button does not tear a hole |
Method — 1. (a) Show by the garments that buttonholes are needed to fit buttons, so as to fasten clothing properly; if the holes are too small for the size of the button, they are useless; if too large, they are untidy and liable to slip off the buttons; (b) that buttonholes are always worked on the right side of double material, sometimes at the right-hand side of the garment, and sometimes at the left, e.g. in chemises and shirts; (c) that they are cut on the selvedge, the woof, and the cross of the material; (d) draw an illustration of a band with a button on it at one end, and a slit on the other end to show the use of it; (e) let children draw out two threads of the canvas to represent the hole; (f) tell them to hold the work over the left forefinger, like for settingin gathers, and fasten on at the left-hand side. (This stitch is worked from left to right, like herring-boning.)
2. Fastening on — (a) Show children by the frame how to weave the needle and cotton under and over four threads, on the right side, above the space made by the drawn threads; (b) let the children weave the needle under and over the material in the same way; (e) then draw the needle and cotton out, leaving a very short end, which will be covered by the last stitch of the opposite side of the slit, and also worked over, when bracing the end.
3. The Stitch — (a) Show how to put the needle into the space immediately below the fastening-on cotton, in a vertical direction under four threads, keeping the fastening-on cotton behind the eye of the needle, and putting the cotton coming from the eye of the needle round its point from left to right, then drawing the needle out and up to the top, rather loosely, making a knot.
Repeat this, letting children work with you, then examine; (b) let the children see that two straight upright stitches are made, covering four threads, both on the right and wrong sides; (c) illustrate on the sectional diagram thus: — put a mark in a space, No. 1, count down four lines and mark a dotted line to represent the stitch on the wrong side, then put a thick chalk line to represent the stitch on the right side, with a knot at the top of it; (d) explain that the knots of the buttonhole stitches protect the raw edges of the material, when cut to form a buttonhole, and that these knots require room to lie flat and in regular order, so a thread must be left between each stitch on coarse material, and two threads on fine.
(The buttonhole stitches should never be too far apart, or the hole has a ragged unfinished appearance, and is not firm and durable.)
4 — (a) Show children how to put the cotton, coming from the knot back over the left hand, that it may lie behind the needle; (b) then how to put the needle into the lining at the back of the canvas, one thread to the right of the last stitch, under four threads vertically as before, and bring the cotton from the eye of the needle and place it round the point from left to right, draw the needle out and up to the top rather loosely, making a knot; (c) elicit that two stitches are made at the same time, one on the right and one on the wrong side; that the knots are only seen on the right side of the work (this can be clearly shown by the frame); that one thread is left between two stitches; that the stitches must not be drawn tightly; (d) explain that if the stitches are drawn up to the raw edges of the slit too tightly, when working on calico or other material, the edges are apt to be rolled over to the wrong side, giving a ragged appearance, and also making the slit hard at the edges.
Buttonholes should be firm, but the stitches should all lie flat and even as well; (e) illustrate the second stitch on the sectional diagram; (f) demonstrate on the frame, illustrate on the slate, and question, till children can work the stitch without assistance; examine frequently and give individual attention, where it is required.
Don't lose this article. Enter your email below, and I'll send it to you right now. Plus a little crochet inspiration from me, straight to your inbox.
Notes — 1. Another method of fastening on is as follows: — put the needle in between two threads, and bring it out under four threads, vertically, draw the needle through, holding a short end of the cotton with the left hand, and then show the class how to put the needle under this cotton from left to right, to form a half knot, like the first part of tying a string.
The class must do the same on the space made by the drawn threads, putting the short end of cotton under the left second finger, and then putting the needle under this end from left to right. 2. If the cotton coming from the last stitch is allowed to fall in front of the needle, instead of behind it, no knot is made at the top edge, and if the cotton from the eye of needle is put round the point from right to left, only a half knot is the result. 3.
Children should be allowed to practise the stitch on canvas, and should learn all parts of the buttonhole, before they apply the stitch to a slit on calico.
Children should be allowed to practise the stitch on canvas, and should learn all parts of the buttonhole, before they apply the stitch to a slit on calico.
The knotted corner
Method — 1. (a) Show children specimens of buttonholes, either with both corners rounded or barred, or with one corner rounded and the other barred; (b) tell children they have to learn how to work a buttonhole with one corner rounded and the other barred, while they are in Standard IV.; (c) explain that the rounded corner is always worked at that end of the buttonhole nearest the edge of the band, because it lies flatter under the button than the braced end; (d) tell children that the rounded corner can either be made by seven stitches with knots, or nine stitches without knots; that the corner made of knotted stitches is unquestionably the stronger of the two, and if the stitches are worked with regular spaces between them, it will set as well under the button as the corner made of nine stitches, without knots.
2 — Show by the Demonstration Frame how to make the corner, the children working with you on their canvas samplers, thus: — (a) put the needle under four threads, and one thread to the right of the last stitch, and put the cotton coming from the eye of the needle round the point from left to right, draw the needle out and upwards, thus forming a knotted stitch; (b) illustrate on sectional diagram, and mark this stitch No. 1; examine children’s work; (c) put the needle back into the same hole and bring it out two threads to the right of No. 1, and one thread higher up, so that the needle lies under three threads, and finish this stitch with a knot; (d) recapitulate by means of sectional diagram, counting two lines to the right of No. 1, and one line up, and draw a slanting stitch from the hole over three lines, and a dotted line beside it to represent the stitch on the wrong side; mark this stitch No. 2 and examine children’s work; (e) show by the frame how to work the third stitch: — put the needle back into the same hole, and bring it out two threads to the right of No. 2, and one thread higher up, and make a knot as before; (f) recapitulate by the fourth stitch; put the needle back into the same hole
Notes — 1. The knots of the stitches should be drawn rather tightly or the edges will be raised too much, and so will spoil the shape of the end. 2. In the knotted corner two threads are left between each stitch. If the stitches are put too close together the knots will not lie flat.
Seven stitches in addition to the last stitch of the first side of the hole and the first stitch of the second side are too many, and make a very clumsy end to the buttonhole, so there must only be seven stitches, including the last of the first
The round corner, worked without knots
Method — 1. Tell children when they have quite finished the first side of the hole, and are ready to turn the corner, that in this round corner there are two stitches with knots and nine stitches without knots, and that the nine stitches are divided into sets of three.
2. First Set of Stitches — (a) Show by the frame how to put the needle into the same space as the stitch with a knot, and bring it out four threads deep and one thread to the right; (b) turn frame round and let children see the first of the nine stitches is made on the wrong side of the hole and has no knot; (c) recapitulate on sectional diagram, drawing a dotted line to represent this stitch, then let children make a stitch, and examine their work; (d) show how to put the needle into the same space, and bring it out one thread to the right and one thread higher up, let children see that two stitches are made, one on the right side four threads deep and one on the wrong side three threads deep; (e) recapitulate by sectional diagram, drawing a line and marking it No. 1, and a dotted line to represent the wrong side of No. 2; examine children’s work, when they have made this stitch; (f) show how to put the needle back into the same space, and bring it out one thread to the right and one thread higher up, thus making second stitch on right side and third stitch on wrong side, the children working with you; (g) recapitulate by diagram as before, and examine; (b) show again how to put the needle into the same space, and bring it out one thread to the right and one thread higher up, thus making the third stitch on the right side and the fourth on the wrong side; (i) recapitulate by diagram as before.
The first set of these stitches is now finished, and the children will see they have made the first stitch on the wrong side of the second three.
Source
Elizabeth Rosevear, A Text-book of Needlework, Knitting, and Cutting Out (1893). Public domain. Internet Archive textbookofneedle1893rose.
Reproduced verbatim from the scanned original. Obvious scan errors (broken letters, words split across a line) have been mechanically corrected; nothing has been rewritten or modernised.