As a Valentine’s Day gift to you, I wanted to share the free crochet pattern for the tortoises by Linda featured previously on this blog.
Don't lose this article. Enter your email below, and I'll send it to you right now. Plus a little crochet inspiration from me, straight to your inbox.
The Background Story
Linda Davie so generously shared her story with us last fall about dealing with cancer and how she used crochet designs to help keep herself healthy and distracted. She loves to crochet to give to others.
At that time I shared:
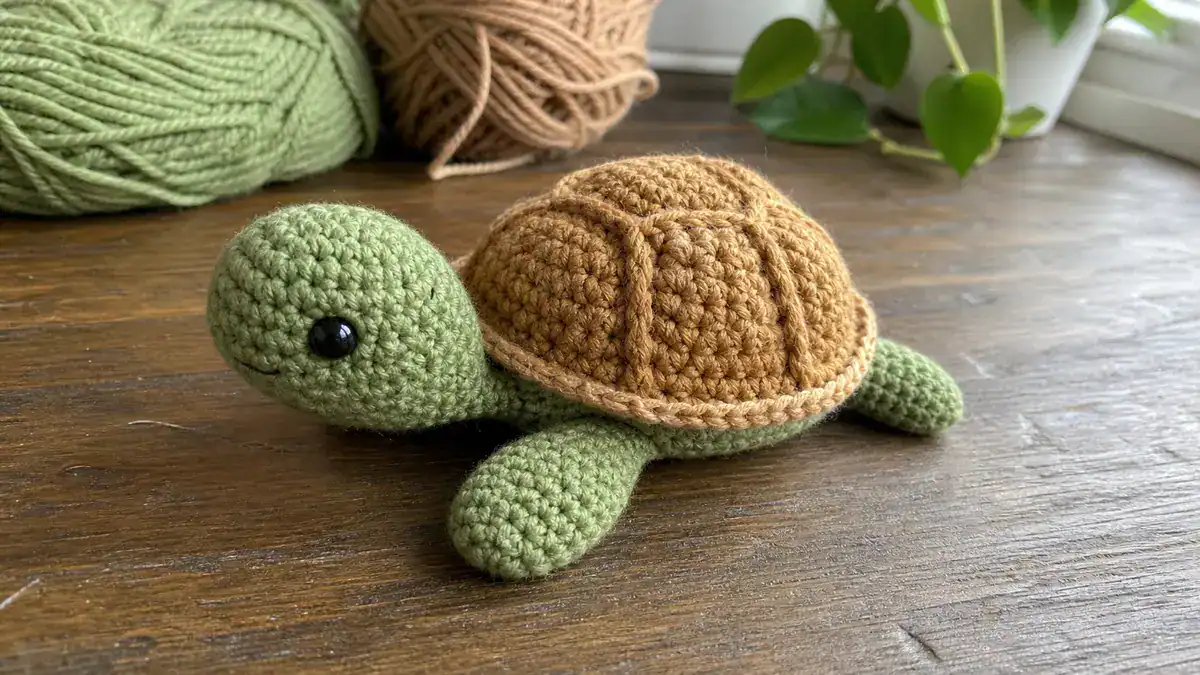
Linda’s latest project. “She found a pattern in Russian for crochet tortoises, so spent a very long evening translating the pattern into English and made this fantastic tortoise and is planning at least a couple more.”
One of the tortoises that she’s made is a rainbow tortoise to help fundraise for an LGTBQ+ teen suicide prevention function.
A little while after that Linda gave us an update, which said in part:
“I am happy to report that I have finished all of my treatments and am trying to find where my life lies now. I have a beautiful family who keep me busy and we’re now looking forward to settling back into whatever ‘normal’ family life is/was! I highly recommend crochet or ANY form of similar positive mind-occupying craft to everyone – ‘healthy’ or not!”
I was so happy to hear this.
The Crochet Tortoise Pattern
Lots of readers were loving the crochet tortoises that Linda was making and really wanted to know where to find the pattern themselves.
Linda has generously chosen to share with us her translation of the original Russian crochet pattern. Here’s what she shared, in her own words:
‘Russian Turtles’ Crochet Pattern
This pattern has been translated by me with the help of ‘Google Translate’ and ‘Bing Translate’ from a pattern written in Russian – “from the author of ‘Owl with Country Artists’ site, Solovyov.”
I make no claims to ownership of the original pattern nor am I gaining any financial benefit from sharing a pattern that is already freely available – I am merely re-presenting it in a form that others will hopefully understand. Any changes are unintentional and due only to differences in language or my interpretation of the given translation into US crochet terms.
Link for the original pattern page. You will need to access this page if you wish to view pictures that may help you (for the skeleton structure, mouth, and eye position) – I will not be reproducing them here. The turtles represented on the page are all made using the same thickness of yarn – but the turtles do get smaller in size as you go up the stack. From what I can tell, they have achieved this by using smaller hook sizes for each turtle.
You Will Need:
- Three colors of yarn – I used an 8ply acrylic yarn.
- Beads for the eyes
- Thick wire for the ‘skeleton’ and pliers to bend it. – I used an old wire coat hanger.
- 3.5mm crochet hook for body parts and 4.5mm crochet hook for the top shell and belly.
- Needle for sewing in ends and attaching eyes and mouth.
- Polyester-fiber toy filling/stuffing.
The turtle is made in the Amigurumi style of crochet – use a stitch marker to mark the beginning st of each round – move it after every round to the last stitch that you worked.
Abbreviations (US Crochet Terms):
- ch: chain
- sc: single crochet
- dc: double crochet
- sl st: slip stitch
- inc: increase = 2sc in 1stitch.
- dec: decrease = sc 2sts together.
- tog: together
- mm: move stitch maker
Body Parts
*There is no need to leave extra-long threads when finishing off body parts as they are attached to the body by crocheting in later rounds of the under-belly…not much sewing required other than sewing in ends!
Head
6 sc in a magic ring.
Rnd 1: 2sc in ea (12sts)
Rnd 2: (1sc, inc) 6 times (18sts)
Rnd 3: (2sc, inc) 6 times (24sts)
Rnd 4: (3sc, inc) 6 times (30sts)
Rnd 5: (4sc, inc) 6 times (36sts)
Rnd 6: 36sc
Rnd 7: (5sc, inc) 6 times (42sts)
Rnd 8: 42sc
Rnd 9: (6sc, inc) 6 times (48sts)
Rnd 10: 48sc
Rnd 11: (7sc, inc) 6 times (54sts)
Rnds 12-14: 54sc
Rnd 15: (7sc, dec) 6 times (48sts)
Rnd 16: 48sc
Rnd 17: (6sc, dec) 6 times (42sts)
Rnd 18: 42sc
Rnd 19: (5sc, dec) 6 times (36sts)
Rnds 20-22: 36sc
Rnd 23: (4sc, dec) 6 times (30sts)
Rnd 24: 30sc
Rnd 25: 12sc, (sc, dec) 6 times (this will be the chin, the bottom of the head) (24sts)
Rnds 26-29: 24sc
Rnd 30: (10sc, dec), 2 times (22sts)
Rnds 31-36: 22sc
Rnd 37: (9sc, dec), 2 times (20sts)
Rnds 38 & 39: 20sc, finish off.
Leg
You will need to make 4 of these!
5ch. Begin in 2nd ch from the hook, 3sc, 3sc in last st, 2sc, 2sc in last st. (10sts) *If using a stitch marker, place it on the last stitch…..rounds begin here.
Rnd 1: inc, 2sc, inc in next 3sts, 2sc, inc in next 2sts. (16sts)
Rnd 2: sc, inc, 2sc, (sc, inc) 3 times, 2sc, (sc, inc), 2 times (22sts)
Rnd 3: 2sc, inc, 2sc, (2sc, inc) 3 times, 2sc, (2sc, inc), 2 times (28sts)
Rnds 4-16: (13 rows): sc in ea.
Rnd 17: 2sc, dec, 2sc, (2sc, dec) 3 times, 2sc, (2sc, dec), 2 times (22sts)
Rnds 18 & 19: sc in each st around.
Rnd 20: (9sc, dec), 2 times (20sts)
Rnd 21: 20sc, finish off.
Tail
4 sc in a magic ring.
Rnd 1: 4sc (4sts)
Rnd 2: inc, 4sc (5sts)
Rnd 3: inc, 5sc (6sts)
Continue working rounds, inc in the first st of each round until you have 14sc in total, finish off.
Top Shell – Spiral Hexagon
(make 7) It may look daunting, but long story short…..you are just working a normal circle, changing colors halfway around. Just take your time and follow each step.
In main shell color (A), 6 sc in a magic ring, place stitch marker.
Rnd 1: inc in each of the next 3 sc (A), then before you drop (A) pull up a loop of yarn so that your previous work will not be undone while you work on the second color. Attach swirl color (B) with a sl st into the next sc, ch1 and then work 2sc into this sc and inc in each of the next 2sc. mm (12sts)
Rnd 2: Continue in (B)…..(1sc, inc) 3 times, then before you drop (B) pull up a loop of yarn so that your previous work will not be undone while you work on the next color. Insert your hook into the loop that you made before (A) and pull it up tight to your hook then work (1sc, inc) 3 times with (A) working into the top of the (B) sts that you worked in the previous round. mm (18sts)
Rnd 3: Continue in (A)……(2sc, inc) 3 times, then before you drop (A) pull up a loop of yarn so that your previous work will not be undone while you work on the next color. Insert your hook into the loop that you made before (B) and pull it up tight to your hook then work (2sc, inc) 3 times with (B). mm (24sts)
Rnd 4: Continue in (B)…..(3sc, inc) 3 times, then before you drop (B) pull up a loop of yarn so that your previous work will not be undone while you work on the next color. Insert your hook into the loop that you made before (A) and pull it up tight to your hook then work (3sc, inc) 3 times with (A). mm (30sts)
Don't lose this article. Enter your email below, and I'll send it to you right now. Plus a little crochet inspiration from me, straight to your inbox.
Rnd 5: Continue in (A)……(4sc, inc) 3 times, then before you drop (A) pull up a loop of yarn so that your previous work will not be undone while you work on the next color. Insert your hook into the loop that you made before (B) and pull it up tight to your hook then work (4sc, inc) 3 times with (B), then remove stitch marker and finish off (B). (36sts)
Rnd 6: Rotate your work counter-clockwise to your (A) color, then continue working around the circle in (A) …..(5sc, inc) 6 times, finish off. (42sts)
Join hexagons using one motif as a centerpiece and connecting the others together around it using whichever method you are comfortable with using, either sc or sew together. I chose to sew mine together to get a ridge between each motif – either look is fine.
To create the rest of the shell, work around the outer edges of the motif group that we have just joined together. Join main shell color (A) with a sl st into the join between any 2 hexagons, ch 1.
Rnd 1: sc in each sc around (126sts)
Rnd 2: 1sc (19 sc, dec) 6 times, your ‘dec’ should fall into the join between the hexagons, (pick up one st of one hexagon and one st of the next hexagon and work dec. (120sts)
Rnd 3: (dec, 15 sc, dec, sc) 6 times – the ‘sc’ between the ‘dec’s’ should fall in the join between the hexagons…..work the ‘sc’ into the ‘dec’ you worked between the hexagons in the previous row.
Rnd 4: (sl st, 15 sc, sl st, 3dc tog) 6 times – your 3dc tog should fall into the joint between the hexagons of the previous round……they will fill the ‘valley’ and form a straight line for the next rounds.
Rnds 5-7: sc in ea st, do not cut off yarn as you will use this to connect the 2 shell halves later. (120sts)
Under-belly Shell
There are different pattern suggestions shown in the pictures on the linked page, but they don’t actually give a pattern for them as such – you can just do a plain shell or create a random pattern. I did mine in dark grey and then did every 1st sc in each set in every round in light grey, then between those lines, I just placed random stitches of pink and light grey to tie in the top shell colors.
Basic tummy is as follows:
7sc in a magic ring
Rnd 1: inc around (14sts)
Rnd 2: (1sc, inc.) 7 times (21sts)
Rnd 3: (2sc, inc.) 7 times (28sts)
Rnd 4: (3sc, inc.) 7 times (35sts)
Rnd 5: (4sc, inc.) 7 times (42sts)
Rnd 6: (5sc, inc.) 7 times (49sts)
Rnd 7: (6sc, inc.) 7 times (56sts)
Rnd 8: (7sc, inc.) 7 times (63sts)
Rnd 9: (8sc, inc.) 7 times (70sts)
Rnd 10: (9sc, inc.) 7 times (77sts)
Rnd 11: (10sc, inc.) 7 times (84sts)
Rnd 12: (11sc, inc.) 7 times (91sts)
Rnd 13: (12sc, inc.) 7 times (98sts)
Rnd 14: (13sc, inc.) 7 times (105sts)
Rnd 15: (14sc, inc.) 7 times (112sts)
*Finish patterning here as this is where the shell-plate ends and the sides begin – continue in single belly color.
Rnd 16: (15sc, inc.) 7 times (119sts) * I wanted the ‘shell’ to have an edge, so I worked this row in the back loops only – it’s entirely up to you……you can just work a normal sc round if you wish – makes no difference overall. I also worked rnd 16 and the remaining rounds in light grey – you do not need to change color if you don’t wish to.
Rnds 17 & 18: sc around, do not cut off yarn.
Join the Body Parts as Follows
(refer to web page for illustration of correct limb placement);
Rnd 19: 11sc, sc in next 10sts working through the leg piece and the shell together (pics on page), 10sc, 10sc joining next leg with body, 10sc, 10sc joining the head (ensure ‘chin’ side of the head – where you did the decreases in Rnd 25 of the head – is facing the under-belly), 10sc, 10sc joining next leg, 10sc, 10sc joining last leg, 12sc, 7sc joining the tail.
Rnd 20: sc in each sc of the previous row, capturing the remaining free stitches of the limbs and head as you work your way around.
Rnds 21 & 22: sc in each st around, finish off.
Refer to the pics on the web page for making the ‘skeleton’ – you will need a piece of wire from the tail to the head, and two pieces of wire connecting legs in pairs, making sure to use the pliers to coil the ends of the wires so that they do not poke through the body. Before inserting the frame, I pre-stuffed the head, legs, and tail about halfway.
Insert the frame – I connected the legs and spine by tying with some scrap yarn but joining the skeletal pieces is referred to as an optional step-up to you. Once skeletal frame is in place, stuff the head, feet, and tail around the wires to keep them roughly centered.
Joining the Top Shell to the Under-belly:
Rnd 1: Align the top shell so that the head, legs, and tail are located in line with the joins between the spiral hexagons on the top shell. Have the top shell facing you as you work. Using your top shell main color and starting next to the tail, sc the 2 halves together. The top shell has 120sts, lower has 119 so sc all around and just take up the extra st when you get to the end of the row – it will not be visible on the finished turtle. It is a fairly tedious process to get the 2 halves together, but be patient – you’ll get there! Remember to firmly stuff your turtle before you finish this round and leave your yarn connected for the next round.
Rnd 2: (2sc, inc) to end.
Rnds 3 & 4: sc in each st around
Change to contrasting color. I used my swirl color here – you can use whatever you like.
Rnd 5: (6 sc, inc) around working your ‘inc’ sts into the sc’s of Rnd 3 (see photo on web page).
Rnd 6: Change back to your main shell color, sc in each st around, finish off.
Now for the Gorgeous Face!
Again – refer to the web page as there is a series of pictures that give you a very clear step-by-step guide to creating the face and attaching the eye beads, so I won’t bother to explain it in depth here…..I’ll just give the basic instructions.
Embroider mouth, placing your stitches smoothly between the rows as pictured.
To attach eyes, insert the needle into the corner of the mouth, and navigate it to the location of one of the eyes. Thread the bead into position, then push the needle back down to where you first inserted it near the mouth. As you tie off the threads, pull tight enough so that the cheek and ‘smile’ is formed at the same time as the eye is pulled down into the head. Tie the ends off firmly and sew in thread ends. Repeat the same process with a new thread on the other side of the face.
A note about the eyes: The pattern as far as I could tell did not specify a bead size for the eyes – I used black 6mm wooden beads. When I made the eyelid stated in the pattern, it was far too big for my bead! I will provide you with the translated original eyelid pattern AND the one that I made up to fit my beads.
Eyelid translated from original pattern
Make 2 – 10ch
Starting in 2nd ch from hook, work 9 sc, turn. Sl st into 2nd st, 1sc, 3 dc, 1sc, sl st, turn.
Ch1, 4 sc, 2sl sts, turn. Sl st into 2nd st, 1sc, inc, 2sc, 2sl st, turn. Sl st into 2nd st, sl st, 5sc, 3sl st, finish off leaving an end long enough to attach eyelid as per pictures on the web page.
My Eyelid (smaller than original pattern)
Make 2 – 8ch
Sl st into 2nd st, 7sc, turn. Sl st into 2nd st, 1sc, 3dc tog, 2sc, sl st, finish off leaving an end long enough to attach eyelid as per pictures on the web page.
Congratulations…..you have just finished your very first ‘Russian Turtle’!
For a slightly different look, I thought I’d also give you the option of a 3-color spiral hexagon!
Three-color Spiral Hexagons:
Every color change in the spiral hexagon is done by pulling up the loop of the color that you are working on (to prevent it from unraveling while you work on the next color), then start your next color by placing your hook into the loop of your next color, pulling it up tight to your hook and start crocheting. SO…to save me typing that over and over again, AGAIN……where you see the word CHANGE, follow these instructions!
Another tip…if you are confused about which color you are up to, then copy and paste this pattern into a ‘Word’ document and actually change the colors of the (A), (B), and (C) in the written pattern to represent the actual color of yarn that you are working with.
Using main shell color (A) and make 2sc in a magic ring, then attach second color (B) with a sl st, 1ch and make 2sc in the ring, then attach third color (C) with a sl st, 1ch, and make 2sc in the ring, place stitch marker. (6sts)
Rnd 1: Continue in (C) and inc in ea of the next 2sts, CHANGE to (A) and inc in ea of the next 2sts, CHANGE to (B) and inc in ea of the next 2sts. mm (12sts)
Rnd 2: Continue in (B) and work (1sc, inc) 2 times, CHANGE to (C) and work (1sc, inc) 2 times, CHANGE to (A) and work (1sc, inc) 2 times. mm (18sts)
Rnd 3: Continue in (A) and work (2sc, inc) 2 times, CHANGE to (B) and work (2sc,inc) 2 times, CHANGE to (C) and work (2sc, inc) 2 times. mm (24sts)
Rnd 4: Continue in (C) and work (3sc, inc) 2 times, CHANGE to (A) and work (3sc,inc) 2 times, CHANGE to (B) and work (3sc, inc) 2 times. mm (30sts)
Rnd 5: Continue in (B) and work (4sc,inc) 2 times, finish off (B), CHANGE to (C) and work (4sc,inc) 2 times, finish off (C) CHANGE to (A) and work (4sc, inc) 2 times. mm (36sts)
Rnd 6: Continue in (A) and work (5sc, inc) 6 times, finish off. mm (42sts)

Thank you this is so sweet!
I just found the picture I had saved but didn’t know how I was going to do it without a translation. Thank you for sharing.
So happy you made it through all your treatments and putting your life back together. I will keep you in my prayers
very cute – thank you for sharing!
In making the spiral hexagons for the top shell, I’d suggest the following slight tweak: Follow the directions up through the first times you use color A and color B, but starting the first time you come back to color A (the second time color A appears), crochet through only the back loop of each stitch for a subtle but nice optical effect.
In making the spiral hexagons for the top shell, I’d suggest the
following slight tweak: Follow the directions up through the first times
you use color A and color B, but starting the first time you come back
to color A (the second time color A appears), crochet through only the back loop of each stitch for a subtle but nice optical effect.
In making the spiral hexagons for the top shell, I’d suggest the
following slight tweak: Follow the directions up through the first times
you use color A and color B, but starting the first time you come back
to color A (the second time color A appears), crochet through only the
back loop of each stitch for a subtle but nice optical effect.
@M Thanks, I appreciate the extra info!
That is awesome how you you translated the pattern to english. I think that it’s a lot of work. It makes me want to translate some spanish pattern to english. Thank you for sharing.
Carmen
Hi with the skeleton of the turtle what size thickness for the wire
The designer used an old coat hanger so something with approximately that thickness would be best.
Thank you so very much for the pain taking effort it took to translate the pattern and then yet to crochet us such a beautiful work of art ( to Linda ) Kathryn thanks for posting such a top notch pattern as I have come to find on your site
you are one inspiring person! You’ve managed to translate the pattern and still share it with us. Thank you so much for resharing. This will be my next project to complete xx
Thank you for sharing this, my friend saw it and Has to have me make it for her. Like she needs more animals in her home, but this one doesn’t make a mess like the rest of hers do. LOL
Hello, first of all , many thanks for the Pattern!!!.
I think that Round 25 don’t seem to right …. I made four times the same Round and came out wrong… Do I made any mistake ?
Please, help me.
Again, many thanks for the Pattern.
You very generous !
Best regards,
Zizi
Hi, the Round I commented above, is from the Head (round 25).
I am confused, because I made the round right, but something is missed…
Would You please, help me to understand where I made any mistake crocheting the Head, because I just could make two times 12 SC and 2deacreses, and them left 6SC… Sorry for any trouble.
Thank you very much.
Zz
Hi, topshell- when joined al hexogan and finish row 4 you write 120 sts? how can it be 120 when you have dec? you are starting with 120 sts, you dec and end up with 120 sts?
Hi, just wondering if anyone has the solution to the previous comment, I have joined the hexagons and done row 1 & 2 120 st, but when you get to row 3 & 4 it tells you to continue decreasing but says you have 120 st, can someone help please thanks
Can you tell me her(the turtle) approximate size.
Sorry name is Danielle on last post
I’m confused on beginning the feet. How many sets are in a he chains?
Thank you so much for sharing and taking the time to translate!
I hope you are feeling better and cancer free! I will keep you in my prayers!???
Un grand merci à vous pour ce partage
I made this for my 13 yo granddaughter. Made her in schools. She was so tickled with her new friend.
Thanks for the translated pattern.
Why is there 3dc together when there is no dc made though this pattern it doesn’t come out right.
It was row 16 and 17 on the leg that I am having trouble translating it to get
The right amount of stitches.
I saw this turtle and it was so cute! My grandson wanted me to make it for him. I had no problems with the pattern till I got to the rounds after the hexagons. I noticed others were having a problem with it as well. I am posting this so that others who may try the pattern will have a solution.
Round 3 you should have 108 sts/
Round 4 – I researched the translation from the original pattern in Russian it it should be as follows: (hdc, 15 sc, hdc, 3 dc in the next st) 6 times. You should then have the 120 sts.
I am about to make the under side of the turtle. In looking at the original Russian pattern, to get the look, you start with 1 color for the initial 7sc and the increase then change color and do only the increases in the color you started with and you will get the fabulous color pattern. It also says you can randomly put stitches of the starting color if you like.
I plan to just carry along the colors as I work as you would if you were working in a tail, then pick up the other color as I go. As an example of what I am talking about (assuming you are using two colors yellow and green for example sake) here are the first few rows for example:
Start with green
7 sc in a magic ring
Round 1 – increase around
Round 2 – (Switch to Yellow for 1 sc, switch to green, increase) 7 times
Round 3 – (Switch to yellow for 2 sc, switch to green, increase) 7 times ………….. and so on
For the last rounds you will use only one color for Rounds 16, 17 and 18.
excellent translation and guidance
I will do one Thanks thanks