By Clara June
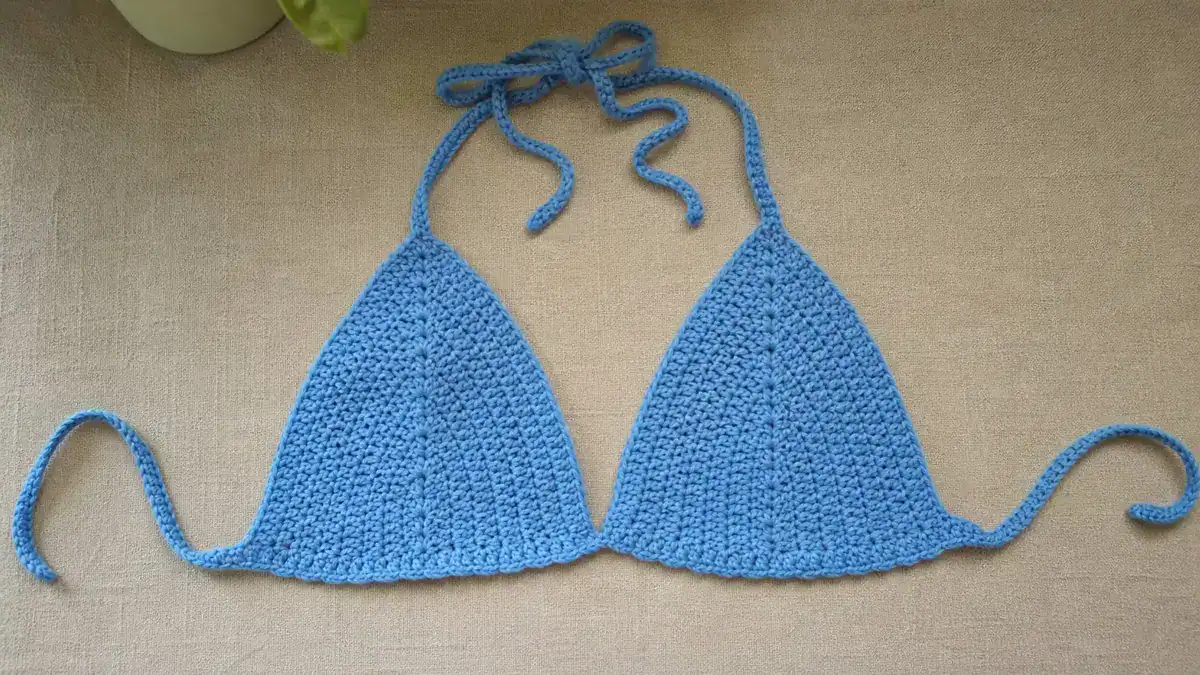
There’s nothing quite like the feeling of wearing something you made with your own two hands, especially when the weather warms up! This Seabreeze Crochet Bikini Top is the perfect summer project. It combines a classic, flattering triangle shape with a dense, secure fabric so you can feel confident whether you’re lounging by the pool or heading to a festival.
Don't lose this article. Enter your email below, and I'll send it to you right now. Plus a little crochet inspiration from me, straight to your inbox.
Perfect for confident beginners, this pattern uses only basic single crochet stitches and simple decreases. By working from the bottom up, you can easily check the width against your own measurements right from the start. The result is a sturdy, beautiful top that works up in just a few hours.
Quick Stats:
- Skill Level: Easy
- Finished Size: Fits B/C cup (Width: 6.5″, Height: 7″)
- Yarn: Worsted weight cotton, approximately 150 yards
- Hook: US G/6 (4.0 mm)
Scroll down for the complete free pattern with stitch counts at every row!
What You’ll Need
- Yarn: Worsted (Weight 4) 100% Cotton yarn — approximately 150 yards total. (Cotton is highly recommended as it holds its shape when wet and breathes well in the heat.)
- Hook: US G/6 (4.0 mm) crochet hook
- Notions: Yarn needle, scissors, measuring tape
- Gauge: 16 sts × 18 rows = 4″ in single crochet
Tips Before You Start
- Gauge check: While a bikini top is small, gauge is critical for garments! A tighter gauge ensures the fabric is dense enough to be nonsee-through.
- Yarn substitution: If you can’t find 100% cotton, a cotton-bamboo or cotton-acrylic blend will work, but avoid 100% acrylic or wool for swimwear, as they can sag or feel too warm.
- Customization: Need a larger or smaller cup? Simply add or subtract starting chains in multiples of 2. To make the cup taller without making it wider, add more even rows between your decrease rows.
Pattern Instructions
Special Stitches
sc2tog (single crochet 2 together): Insert hook into next st, yarn over and pull up a loop (2 loops on hook). Insert hook into following st, yarn over and pull up a loop (3 loops on hook). Yarn over and pull through all 3 loops. (Decreases stitch count by 1)
Notes
- Pattern is worked flat in rows from the bottom up to form a triangle.
- Ch 1 at the beginning of rows does NOT count as a stitch.
- Stitch counts are given in bold at the end of each row.
Cups (Make 2)
Foundation: Ch 27.
Row 1 (RS): Sc in 2nd ch from hook and in each ch across. (26 sts)
Row 2 (WS): Ch 1, turn. Sc in each st across. (26 sts)
Row 3: Ch 1, turn. Sc in each st across. (26 sts)
Row 4: Ch 1, turn. Sc2tog, sc in next 22 sts, sc2tog. (24 sts)
Row 5: Ch 1, turn. Sc in each st across. (24 sts)
Row 6: Ch 1, turn. Sc in each st across. (24 sts)
Row 7: Ch 1, turn. Sc2tog, sc in next 20 sts, sc2tog. (22 sts)
Row 8: Ch 1, turn. Sc in each st across. (22 sts)
Row 9: Ch 1, turn. Sc in each st across. (22 sts)
Row 10: Ch 1, turn. Sc2tog, sc in next 18 sts, sc2tog. (20 sts)
Row 11: Ch 1, turn. Sc in each st across. (20 sts)
Row 12: Ch 1, turn. Sc in each st across. (20 sts)
Row 13: Ch 1, turn. Sc2tog, sc in next 16 sts, sc2tog. (18 sts)
Row 14: Ch 1, turn. Sc in each st across. (18 sts)
Row 15: Ch 1, turn. Sc in each st across. (18 sts)
Row 16: Ch 1, turn. Sc2tog, sc in next 14 sts, sc2tog. (16 sts)
Row 17: Ch 1, turn. Sc in each st across. (16 sts)
Row 18: Ch 1, turn. Sc in each st across. (16 sts)
Row 19: Ch 1, turn. Sc2tog, sc in next 12 sts, sc2tog. (14 sts)
Don't lose this article. Enter your email below, and I'll send it to you right now. Plus a little crochet inspiration from me, straight to your inbox.
Row 20: Ch 1, turn. Sc in each st across. (14 sts)
Row 21: Ch 1, turn. Sc in each st across. (14 sts)
Row 22: Ch 1, turn. Sc2tog, sc in next 10 sts, sc2tog. (12 sts)
Row 23: Ch 1, turn. Sc in each st across. (12 sts)
Row 24: Ch 1, turn. Sc in each st across. (12 sts)
Row 25: Ch 1, turn. Sc2tog, sc in next 8 sts, sc2tog. (10 sts)
Row 26: Ch 1, turn. Sc in each st across. (10 sts)
Row 27: Ch 1, turn. Sc in each st across. (10 sts)
Row 28: Ch 1, turn. Sc2tog, sc in next 6 sts, sc2tog. (8 sts)
Row 29: Ch 1, turn. Sc2tog, sc in next 4 sts, sc2tog. (6 sts)
Row 30: Ch 1, turn. Sc2tog, sc in next 2 sts, sc2tog. (4 sts)
Row 31: Ch 1, turn. Sc2tog twice. (2 sts)
Row 32: Ch 1, turn. Sc2tog. (1 st)
Fasten off and weave in ends.
Cup Edging & Neck Ties (Repeat for both cups)
Row 1: With RS facing, join yarn with a sl st to the bottom right corner of the cup. Ch 1, sc evenly up the right diagonal edge (approx 30 sc), work 3 sc into the top point (Row 32 st), sc evenly down the left diagonal edge (approx 30 sc). (63 sts)
Row 2 (Neck Tie): Do not fasten off. Sl st back up the left edge to reach the center st of the 3 sc at the top point. Ch 65. Sl st in 2nd ch from hook and in each ch across back down to the top of the cup. Sl st into the top point to secure. (64 sts)
Fasten off and weave in ends.
Bottom Tie
Row 1: Ch 150. (150 sts)
Row 2: Sl st in 2nd ch from hook and in each ch across. (149 sts)
Fasten off and weave in ends.
Finishing & Assembly
- Weave in all remaining ends securely.
- Block the cups lightly with steam or water to smooth out the edges and define the triangle shape.
- Take the Bottom Tie and weave it in and out of the stitches along the bottom edge (Row 1) of both cups, spacing them to your preference.
Make It Your Own
- Add a border: Try adding a picot edging or small shell stitch around the cups for a boho festival vibe.
- Thicker straps: If you prefer more support, replace the slip stitch ties with foundation single crochet (fsc) straps, or work a row of single crochet back down your chain instead of slip stitches.
- Color block: Crochet the edging and straps in a contrasting color for a fun, sporty look!
Frequently Asked Questions
How much yarn do I need for this bikini top?
You’ll need approximately 150 yards of worsted-weight cotton yarn for a B/C cup. If you are sizing up, grab a second skein just to be safe!
Can I wear this in the water?
Yes! If you use 100% cotton yarn, it will hold up well in the water. Keep in mind that crochet fabric is naturally heavier when wet, so ensure your ties are securely fastened.
Is this pattern beginner-friendly?
Absolutely. If you know how to chain, single crochet, and decrease (sc2tog), you can make this top. The bottom-up construction makes it very easy to track your stitches.
I’d love to see your finished Seabreeze Bikini Top! Tag me on Instagram or share your photos in our Facebook group.
Pin this pattern for later!